MYTH EMBODIED
A Monograph Project in Costume Technology
by William Andrew Young
ARMOR
For this set of armor I explored a new methodology. I had used combinations of thermoplastic (Worbla) and EVA foam before but had never used foam by itself. I needed to cut costs, maintain highly flexible pieces, and reduce weight which is why I decided to try this method.
I developed the pattern for most of the armor by draping it on a dress form padded to Bea's exact measurements. I developed the pauldron and wrist/elbow/knee extension patterns through flat pattern experimentation and poster mock-ups.
The armor is cut from 3/8" and 5/8" foam (the breastplate and hip faulds are cut from the thicker foam). It is very dense and quite strong, and it is assembled using Barge contact cement.
The scales are all cut with a Cricut Maker, although I originally intended them to be cut with a laser cutter for more precision. Originally, the gold dots on each scale were to be engraved circles, but the Cricut was unable to accomplish this level of precision and doing it by hand was not worthwhile.
Each scale has an individual bead of glue placed at the base because the ends of the scales HAD to remain raised in order to paint the armor quickly and effectively. The base of every single scale was also pinned down as the glue dried. There are approximately 3,500 scales across all the armor pieces.
After glueing all the scales on, they were cut away from the edges and the edges were trimmed with shaped strips of pleather. All the armor edges were then sealed using Flexbond-- this served to secure it to the surface of the scales as well as further secure the edge of the foam with the edge of the scales to prevent them pulling away when the armor was under strain.
The rigging is low-tech, incredibly fast, and extremely practical. Ties made of the same jute cord as the hair pieces is secured to the backs of the armor using pleather strips
PAINT TREATMENT
The paint treatment for the armor was semi-involved.
Each piece is based in black followed by a heavy dry-brushing of a deep green.
This is followed by a heavy drybrushing of a much brighter green which is then followed by a more concentrated drybrushing of this same green focusing on scale tips/high areas in the armor to produce a mottled effect in places.
Next was a final drybrushing of lime green to pick out scale edges and high areas.
All the gold areas are 'painted' with a gold leaf marker followed by a heavy wash with black paint for distressing.
Those areas that have Chinese characters were addressed next. The characters were very lightly outlined with a pencil, followed by a pen outline and then filled in with a fine tip black paint marker.
All gold areas, after distressing and characters, were sealed with Flexbond to protect the thin wash from chipping and to produce a light shine on these areas. Each scale on the costume has a golden dot that was applied with a gold leaf marker after each piece was complete.
HORNS
Originally I intended to 3D print the horns for this costume but as the costume came together, I realized the aesthetic of my design was better served by a more organic approach. Additionally, even with a low infill density I was worried the weight of plastic horns would throw off the balance of the piece and complicate attaching them.
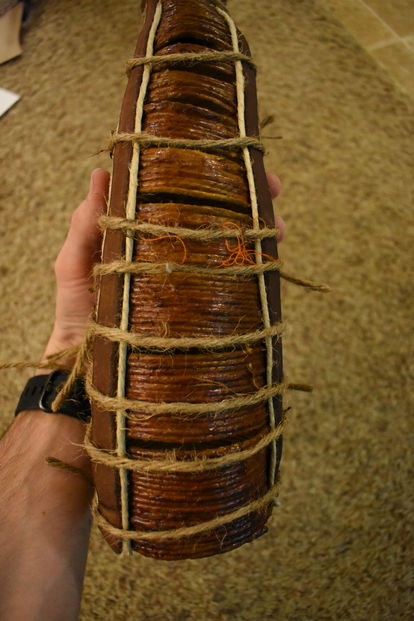
I created two wire-frame horns that I wrapped in duck tape and stuffed. I then wrapped these horns with hemp cord and dyed the hemp with leather dye while it was on the horn frame. As I wrapped, I used straight pins to create gaps across the front of the horns so that you would be able to see light through them. Next I painted a heavy layer of mod podge on to glue the hemp together and maintain some flexibility.
Each horn has three narrow strips of leather attached to it that provide most of the support for the horns. I boiled the leather to thicken it and once it dried it became rock solid. The pieces were tied to the horns as they dried to make sure they were the proper shape.
Next, each leather strip was 'trimmed' with an additional length of hemp. A second dye layer was applied to darken the horns and produce shine, and then a final layer of mod podge was applied as a sealant.
The hemp horns were removed from the wire-frame bases at this point and were ready to attach to the headdress
HEADDRESS
This headdress is comprised of a wired, sized felt skullcap, an EVA foam base covered in hand-painted scales, hollow hemp horns supported with boiled leather, and 'wefted' hair pieces made of dyed muslin, hemp, and jute cord.
The shaping is meant to be reminiscent of Chinese dragons and Chinese Lions while not copying the stylization of either.
This headpiece was designed before any of the rest of the costume and informed the style/aesthetic choices for the entire look.
FIRST FITTING
This costume had only one fitting, the mock-up fitting, where I fit a unitard mock-up and poster mock-ups of each armor piece.
It was my first time fitting stretchwear, but it was a successful experience and led to a successful finished garment.
The armor underwent some slight proportional changes (particularly in the shoulders and hips), and the breastplate was altered slightly along the princess seam for a better fit.
The head did not change shape or proportion.


